Spring is coming. The sun has been out, and tulips were on special at the florists. I couldn't resist buying myself some...
I love the colours of spring, and these tulips inspired me to make a brooch.

Here is how I made it.
Spring flower brooch
Use DK yarn in four colours plus green and a 3.5 or 4mm hook – it is
better to keep tight tension or use a smaller hook for this project. Look at spring flowers for colour inspiration.
Abbreviations:
Slst Slip stitch
Dc double crochet
Htr half treble crochet
Tr treble crochet
Dtr double treble crochet
You will also use a magic ring to start your flower.
All stitches are the English version.
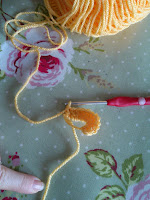
Make a magic ring.
Round
one: Ch 3 (counts as 1st tr).
11 x tr
into ring. Sl st into the top ch of the 3ch first stitch.
You should have 12
stitches.
Pull the ring closed as tightly as you can and sew in the ends.
Round
two: Join in new colour. Ch 4 (this creates 1 dc
plus 3 ch), miss a stitch and dc into the next stitch.
*3ch, miss a stitch and
dc into next stitch.*
Repeat from * to * and sl st into 1st ch to
join. Now you have 6 petal stumps to
work with.
Round
three: (Same colour) *Sl st, dc, htr, 3tr, htr, dc, sl
st* into the ch gap you created in round two.
Repeat from * to * to form 6
petals. Sl st into 1st sl st and fasten off. Sew in loose ends.
Round
four: Working in the gaps inside the petals you
created in rounds two and three, make mini petals.
From
the front, join new colour to one of the missed stitches in round two, and sew
in the tail on the back of your flower.
*Sl st, dc, htr, dc, sl st into the same missed stitch*. Repeat from * to * to create 6 mini petals. Sl st to the first petal and fasten off.
Sew in your loose end.
Round
five: Working behind the petals you made in rounds
two and three, join new colour by working into the back of one of your dcs made
in round two (photo shows back of flower).
Sew in your tail.
*Ch 5 and sl st into the back of the next dc
from round two.*
Repeat from * to * until you have made six chain gaps and join with a sl st.
Round
six: *Sl st, dc, htr, 3tr, 3dtr, 3tr, htr, dc, sl st*
into the chain gap you made in round five.
Repeat from * to * to make six super
sized petals. Sl st to join to 1st petal and fast off. Sew in end.
By
repeating the idea of rounds five and six you can keep increasing your chain
gap length and number/height of stitches until you are happy with the blousy
over-the-top-ness of your flower.
Leaf
Leave yourself a tail long enough to sew
with. Make a slip knot and ch 10.
Row
one: Dc into the second chain from your hook, then 2
htr, 3 tr, 2 htr, dc.
Row
two: Turn. 1 ch (counts as dc), skip 1st
stitch and 2htr, 3 tr, 2 htr, dec, sl st and fasten off.
Sew in end by running a needle along the
“ridge” at the back of your leaf.
Use the tail you left to stitch your leaf to
your flower at the back.
Attach as many leaves as you like, and make
sure they cover your pin so it doesn’t show from the front. I find that odd
numbers work best.
Use a leaf tail to over-stitch a safety pin
to the back of the flower. Make sure your pin doesn’t show at the front by
positioning it behind petals and leaves. Ensure your pin is large enough to use
comfortably.
You
might add a bead or a button or even a bee to the middle of your flower.
It’s
your flower, make it how you like, and enjoy!!!


That is so cute! I might have to try it this weekend. I may be bugging you with questions. I'm kind of slow to pick up on new techniques - for example I've never tried the magic circle & now I see why I might want to use one instead of my usual chain three join with slip stitch routine.
ReplyDeleteBug away! The magic ring is really handy because you don't end up with a big old open hole. But it helps if you're an octopus when you get started. :-)
DeleteI had such fun making this and it looked liked yours......although perhaps not as neat :-)
ReplyDeleteThank you :)
DeleteVery nice.
ReplyDeleteI just tried it out and everything worked out well!
Thank ypu for the nice birthdaypresent idea.